This tutorial shows you how to set up and manage a Python virtual environment.
What is a Virtual Environment?
A Python virtual environment is an environment where the Python interpreter, libraries, and scripts installed into it are isolated from those installed in other virtual environments or globally installed on your computer. Metaphorically speaking, each virtual environment is a world of its own, and don’t care about anything outside it.
Pros and Cons
Before creating a virtual environment, let’s analyze the pros and cons of using it.
Pros
- You can use many different versions of Python as well as many different versions of the same library. This is very important; for example, you can use the latest version of NumPy, FastAPI, Flask, etc, in today’s project without touching old projects.
- You are able to download packages into your project without the sudo (administrator) privilege (for Linux or macOS users, it’s very convenient).
- Avoid system-wide errors. If there is a problem that you cannot fix after many nights, a useful solution is to create a new virtual environment.
- It makes it easy to share, move, or deploy your projects.
Cons
There are two downsides to using virtual environments:
- Your system will consume more storage space (in case you have a virtual environment that uses the same version of Python and the same version of a library as in another virtual environment, it will use the cached files instead of reloading the whole thing – this will save some free storage and internet bandwidth).
- Need more time setting up the environment and installing libraries every time start a new project
The first disadvantage can be easily overcome by upgrading to a new computer (the cost of SSDs and HDDs today has also decreased significantly compared to the 2000s or 2010s). The second downside is not a big deal as it only costs you less than an hour more.
In short, the advantages of using virtual environments far outweigh the disadvantages.
Create a Virtual Environment
venv is a part of core Python since version 3.3, so you can get started right away with no need to install any external library.
1. Make a new directory and navigate into it:
mkdir <folder name>
cd <folder name>
2. Initialize the virtual environment with the version of Python you want:
python3 -m venv <path to virtual environment>You can also place the virtual environment in the current directory by setting the path to a dot:
python3 -m venv .You can specify a certain version of Python, like this:
python3.11 -m venv <path to virtual environment>If the Python version doesn’t matter in your situation, just omit it.
Example:
mkdir sling-academy
cd sling-academy
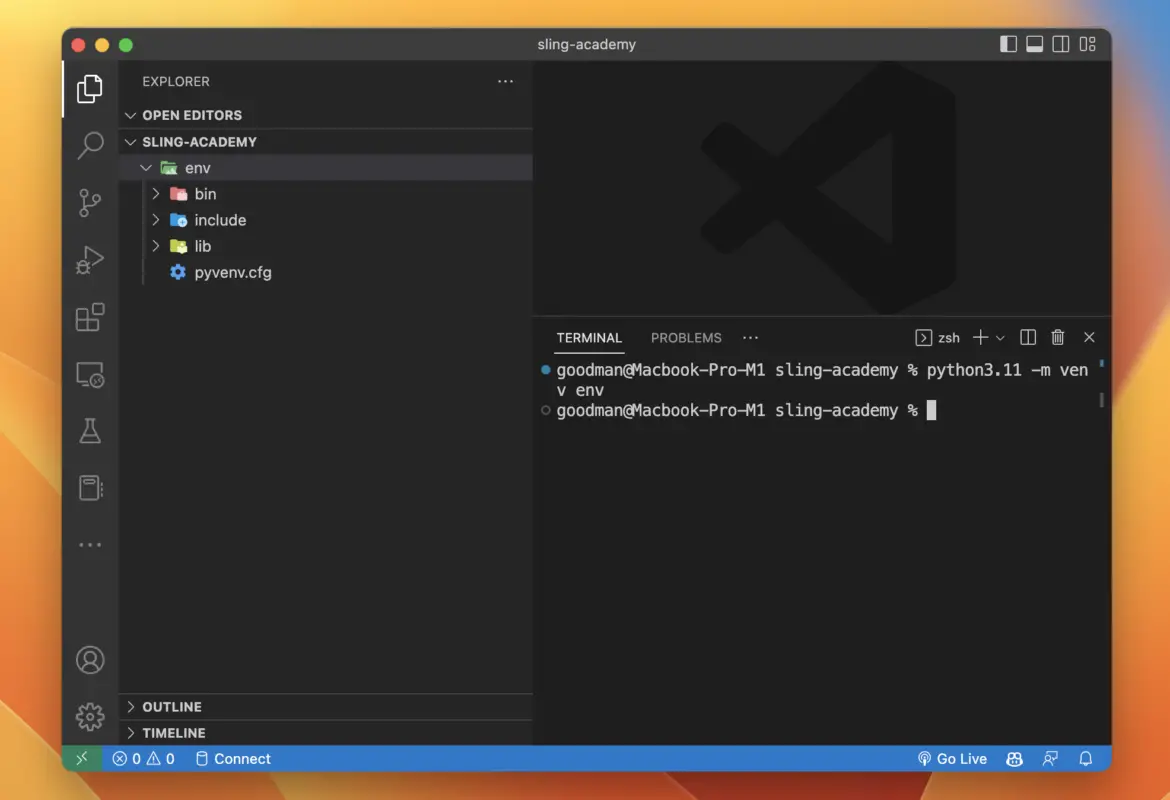
python3.11 -m venv env
You would see a new folder named env automatically created (you can replace env with any name you want). In this folder, you will see some things like this:

The folder named bin (it can also be called Scripts) is where the commands to control the virtual environment are stored.
The include folder stores the C and Python important stuff (for example, if you want to create modules in C and import them in the Python code).
The lib folder contains the packages used in your project.
The file pyvenv.cfg contains some contents as follows:
home = /Library/Frameworks/Python.framework/Versions/3.11/bin
include-system-site-packages = false
version = 3.11.0
executable = /Library/Frameworks/Python.framework/Versions/3.11/bin/python3.11
command = /Library/Frameworks/Python.framework/Versions/3.11/bin/python3.11 -m venv /Users/goodman/Desktop/Dev/python/sling-academy/env
Active Virtual Environment
A virtual environment must be activated. On Windows, run the command below:
 env/Scripts/activate.bat // if you're using cmd
 env/Scripts/Activate.ps1 // if you're using powershel
On Mac, use this one:
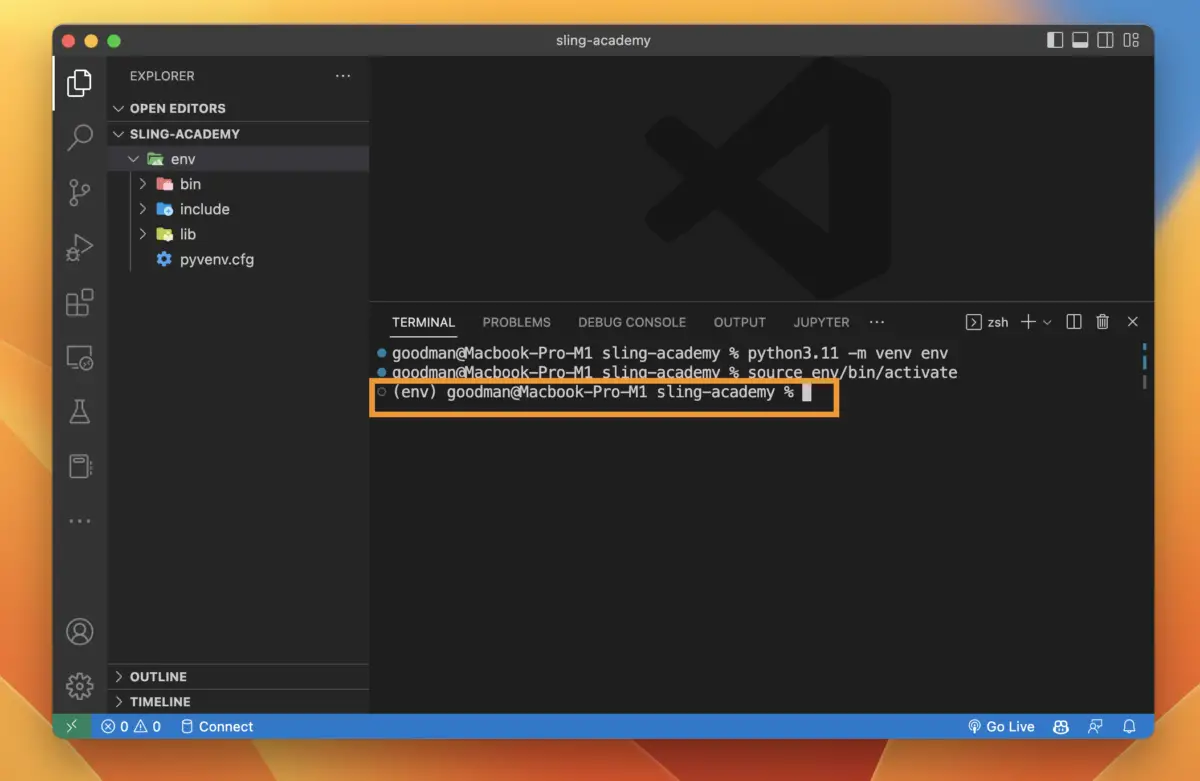
source env/bin/activateYou’ll immediately see the name of the virtual environment appears in the path in your terminal:

Deactivate Virtual Environment
If you want to shut down an active virtual environment, simply execute the following command:
deactivateYou should see the path in the terminal back to normal after that.
Manage Packages in a Python Virtual Environment
Try installing a few popular packages for the virtual environment (when it is activated):
pip install pandas fastapiTo uninstall a package, run this:
pip uninstall <package name>Now you can check the installed packages and their versions again with the command line below:
pip listAnd you’ll receive an output like this:
Package           Version
----------------- -------
anyio             3.6.2
idna              3.4
numpy             1.23.4
pandas            1.5.1
pip               22.3
pydantic          1.10.2
python-dateutil   2.8.2
pytz              2022.5
setuptools        65.5.0
six               1.16.0
sniffio           1.3.0
starlette         0.20.4
typing_extensions 4.4.0
You can also generate a file that stores information about installed packages to share with others by performing this command:
pip freeze > requirements.txtrequirements.txt is not a mandatory name, but it is a convention used by many people. You can use another name if you like, such as package.txt or info.txt.
Now you can share the project with others or push it to GitHub without the env folder (its size is usually not small). When someone else wants to install all the dependencies, they just need to fire up their virtual environment and run the following:
pip install -r requirements.txtSummary
To recap, you’ve learned the following:
- What is a virtual Python environment?
- Advantages and disadvantages of virtual environments
- How to create, activate, and deactivate a virtual environment
- How to manage package dependencies in a virtual environment
Now apply this knowledge to kick off your spectacular project. Happy coding!


