Table of Contents
Quick Overview
To programmatically disable or enable a text input with pure JavaScript, you can set the disabled property of the text input element to true or false, respectively, like this:
// To disable an input with id="foo"
document.getElementById("foo").disabled = true;

// To enable an input with id="bar"
document.getElementById("bar").disabled = false;
An alternative solution is to use the setAttribute and removeAttribute methods of the input element and manipulate the disabled attribute:
// To disable an input with id="foo"
document.getElementById("foo").setAttribute("disabled", "disabled");

// To enable an input with id="bar"
document.getElementById("bar").removeAttribute("disabled");
You can also use a function to toggle the disabled state of all inputs on the page by using a logical NOT operator (!) on their disabled property:
// A function to toggle all inputs on the page
const toggleInputs = () => {
  var inputs = document.getElementsByTagName("input");
  for (var i = 0; i < inputs.length; i++) {
    inputs[i].disabled = !inputs[i].disabled;
  }
}

// To call the function when a button with id="toggle" is clicked
document.getElementById("toggle").onclick = toggleInputs;
The above are only minimal, incomplete examples. To understand better, let’s take a look at the full example below.
Complete Example
Preview
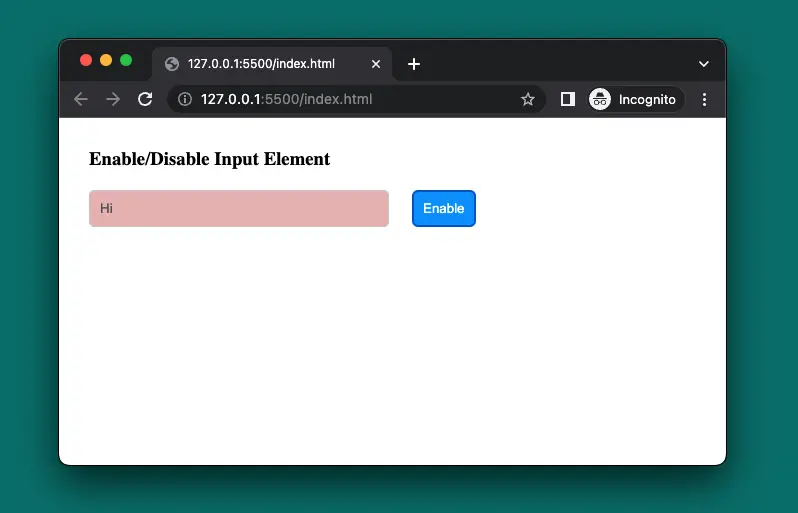
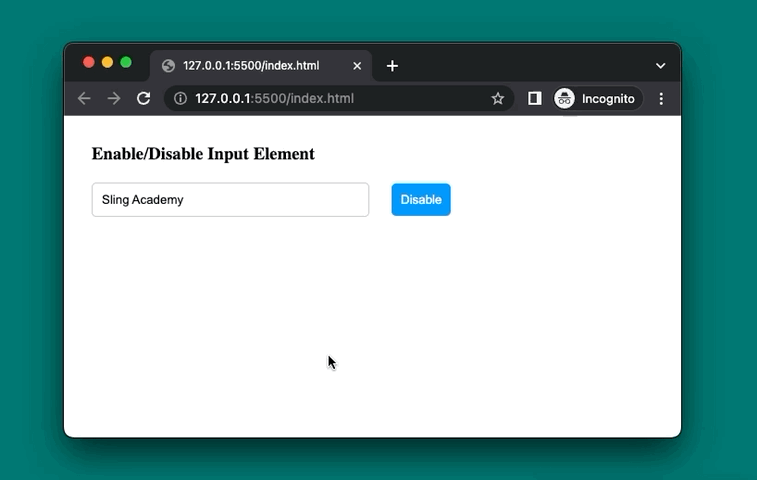
We’re going to create a simple webpage that contains a text field and a blue button. By default, the text field is enabled, and you can interact with it. However, when the button gets clicked for the first time, the text field will become disabled (read-only). To make it typable again, just click the button one more time.
Here’s how it works in action:
The Code
The full source code (with HTML, CSS, JavaScript, and explanations in the comments):
<html>
<head>
    <!-- Some CSS styles -->
    <style>
        * {
            margin: 0;
            padding: 0;
            box-sizing: border-box;

        }

        body {
            padding: 30px;
        }

        input {
            width: 300px;
            padding: 10px;
            border: 1px solid #ccc;
            border-radius: 5px;
            margin: 20px 0;
        }

        input:disabled {
            cursor: not-allowed;
            background-color: rgb(233, 185, 185);
        }

        button {
            padding: 10px;
            background-color: #0099ff;
            color: white;
            border: none;
            border-radius: 5px;
            margin: 20px;
            cursor: pointer;
        }
    </style>
</head>

<body>
    <h3>Enable/Disable Input Element</h3>
    <div>
        <input id="myInput" type="text" value="Sling Academy">
        <button id="myButton" onclick="toggleInput()">Disable</button>
    </div>

    <!-- JavaScript code -->
    <script>
        // Get the input element and the button element
        const input = document.getElementById("myInput");
        const button = document.getElementById("myButton");

        // Define a function to toggle the disabled attribute of the input element
        const toggleInput = () => {
            // If the input is not disabled, disable it and change the button text to "Enable"
            if (!input.disabled) {
                input.disabled = true;
                button.textContent = "Enable";
            }
            // Otherwise, enable it and change the button text to "Disable"
            else {
                input.disabled = false;
                button.textContent = "Disable";
            }
        }
    </script>
</body>

</html>
You can copy all the code and paste it to a new HTML file, then open that HTML file with your favorite web browser.
Use Cases
Some common real-world use cases of using vanilla JavaScript to enable/disable a text input are:
- You want users to log in to be able to type text into a certain text input.
- To create dynamic and interactive web pages that respond to user actions. For example, you can enable a text input when a checkbox is checked or disable a text input when a radio button is selected.
- To control the flow and logic of your web application. For example, you can disable a text input when an asynchronous request is pending or enable a text input when the request is completed.
Hope this helps. Happy coding & have a nice day!


