Introduction
NumPy is a fundamental package for scientific computing in Python. Its wide array of functionalities includes support for multi-dimensional arrays and matrices, along with a collection of mathematical functions to operate on these arrays. One of the groundbreaking features of NumPy is its capability for generating random data. In this tutorial, we will delve into the random.Generator.normal() method, a tool for creating random samples from a normal (Gaussian) distribution, through a series of four progressively complex examples.
Example #1 – Basic Usage of random.Generator.normal()
Let’s begin with the basics. The normal() method generates random numbers based on the normal distribution characterized by its mean (loc) and standard deviation (scale). Below is a simple example:
import numpy as np

rng = np.random.default_rng()
sample = rng.normal(loc=0, scale=1, size=10)
print(sample)
Output (vary):
[-0.2041, 1.0342, -0.8643, ...]This code generates ten random numbers from a standard normal distribution (mean=0, standard deviation=1).
Example #2 – Visualizing the Distribution
Visualization is a powerful tool for understanding data. Here we’ll use Matplotlib to graphically represent a larger sample of normally distributed random numbers:
import numpy as np
import matplotlib.pyplot as plt

rng = np.random.default_rng(seed=2024)
sample = rng.normal(loc=0, scale=1, size=1000)

plt.hist(sample, bins=30, density=True)
plt.title('Normally Distributed Random Samples')
plt.xlabel('Value')
plt.ylabel('Density')
plt.show()
Output:
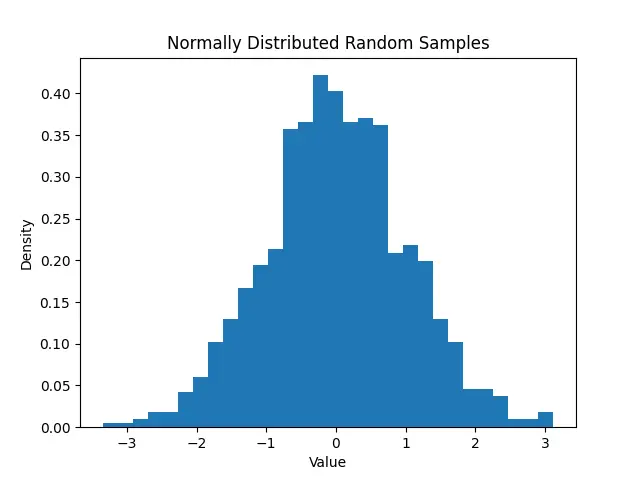
The histogram demonstrates how the samples are distributed around the mean (0), roughly following the bell-shaped curve of the normal distribution.
Example #3 – Generating Different Distributions
With the normal() method, we’re not limited to the standard normal distribution. We can adjust the mean and standard deviation to generate random samples from different normal distributions. Consider the following example where we create two sets of numbers from normal distributions with different means and standard deviations:
import numpy as np

rng = np.random.default_rng(seed=2024)
sample1 = rng.normal(loc=-2, scale=1, size=1000)
sample2 = rng.normal(loc=2, scale=2, size=1000)

# Save samples to different variables
print("Sample 1 Mean:", np.mean(sample1))
print("Sample 2 Mean:", np.mean(sample2))
Output:
Sample 1 Mean: -1.9853598322855595
Sample 2 Mean: 1.896889138955182
We can observe that the generated samples have means close to the specified locations and the spread of the samples follows the specified standard deviations.
Example #4 – Application in Simulations
NumPy’s normal() method is not only for generating random numbers – it’s also an invaluable component in simulation-based studies. Let’s simulate a scenario where the output depends on normally distributed random inputs:
import numpy as np

rng = np.random.default_rng(seed=2024)
def compute_metrics(input_data):
    # Dummy function for demonstrating purposes
    return np.mean(input_data) + np.std(input_data)

# Generate data
input_data = rng.normal(loc=0, scale=1, size=1000)

# Simulate process
result = compute_metrics(input_data)
print("Simulation Result:", result)
Output:
Simulation Result: 1.0308076411808986The above code snippet, though simplistic, shows how normally distributed data can be used to model inputs for simulations, providing insights into potential outcomes and their variability.
Conclusion
Throughout this tutorial, we explored the random.Generator.normal() method in NumPy, starting from basic generation of normally distributed numbers, to visualization, altering distributions, and finally, using these data in simulations. Understanding how to generate and manipulate normally distributed random data is essential for a wide range of scientific computing tasks. With the examples shown, you should now have a solid foundation for generating random numbers in your own applications using NumPy.


