Introduction
NumPy is an essential library in the Python ecosystem for scientific computing, and its random module is a powerhouse for generating random data. Among its many functions, the random.Generator.standard_normal() method is particularly useful for generating samples from a standard normal (Gaussian) distribution, which is common in various fields such as statistics, physics, and machine learning. This tutorial will guide you through how to use this method effectively with four progressively advanced examples. Let’s dive in.
Syntax & Parameters
The method belongs to the Generator class, which is part of the new NumPy random API introduced in NumPy version 1.17. This new API provides an array of methods for generating random numbers in a more predictable and controlled way compared to the legacy numpy.random functions.
Syntax:
Generator.standard_normal(size=None, dtype=np.float64, out=None)Parameters:
- size: Optional. An integer or tuple of integers, specifying the output shape. If the given shape is, for example,
(m, n, k), thenm * n * ksamples are drawn. If size isNone(default), a single value is returned. - dtype: Optional. The desired data-type for the samples. The default data type is
float64. - out: Optional. An alternative output array in which to place the result. It must have a shape that the inputs broadcast to.
Returns:
- out: Samples from the standard Normal distribution. If
sizeisNone, a single float is returned. Otherwise, a NumPy array of shapesizeis returned.
Basic Usage of standard_normal()
To start, let’s look at the most basic use case: generating a single number from a standard normal distribution. Ensure you have NumPy installed, and you can follow along with these examples in any Python environment.
import numpy as np
rng = np.random.default_rng()
number = rng.standard_normal()
print(number)
When you run this small piece of code, you will get a single floating-point number as output. The output will vary each time you run it, due to the randomness inherent in the process.
A possible output:
0.8117905179186238Generating Multiple Samples
Often, you’ll need more than one sample. The standard_normal() method allows you to specify the size of the output array to generate multiple samples at once.
import numpy as np
rng = np.random.default_rng()
samples = rng.standard_normal(size=10)
print(samples)
Running this code snippet will give you an array of 10 numbers sampled from a standard normal distribution. Again, the specific numbers will differ every time you execute it. It will look similar to this:
[ 0.04458217  0.64913176 -0.20139795 -1.0906279   1.38117052 -0.29965721
  0.50327475 -0.23096035 -1.59892917  0.02688157]
Creating a 2D Array
Moving a bit further, you can also generate a 2-dimensional array of samples. This is particularly useful for simulations or generating datasets for machine learning purposes.
import numpy as np
rng = np.random.default_rng()
array2d = rng.standard_normal(size=(5, 4))
print(array2d)
This creates a 5×4 array, i.e., a matrix with 5 rows and 4 columns, each element being a sample from the standard normal distribution. Such a structured output can be particularly useful in numerous scenarios, such as initializing weights in neural networks.
Output (random):
[[-1.40823127  1.67866583  0.52532266  1.29018662]
 [-0.11793212  0.60180093  0.52262474  2.0288199 ]
 [ 0.72654961 -0.47736742  0.24774149  2.48409354]
 [-0.06782492  1.74336776 -1.20196281 -0.80879531]
 [-1.3646733   0.36519446 -0.03705975 -1.20048857]]
Generating Distributions with a Specified Mean and Standard Deviation
Although standard_normal() generates samples with a mean of 0 and a standard deviation of 1, you may often need a distribution with different characteristics. Let me show you how to transform the samples to match any desired mean (\( extmu\\) and standard deviation (\\(\sigma\\).)
import numpy as np
mean = 5
std_dev = 2
rng = np.random.default_rng(seed=2024)

samples = rng.standard_normal(size=1000) * std_dev + mean
print(f'Mean: {np.mean(samples)}, Standard Deviation: {np.std(samples)}')
Output:
Mean: 5.029280335428882, Standard Deviation: 2.0323349469329157This will generate 1000 samples, transforming the standard normal distribution to have a mean of 5 and a standard deviation of 2. Checking the mean and standard deviation of the generated samples, you’ll find they closely match the specified values, showcasing the method’s effectiveness in generating custom distributions.
Visualizing the Distribution
Finally, no tutorial on generating distributions would be complete without visualizing the results. Using Matplotlib, a widely used Python plotting library, we can quickly visualize the distribution of the samples we’ve generated.
import numpy as np
import matplotlib.pyplot as plt
samples = np.random.default_rng(seed=2024).standard_normal(size=1000)
plt.hist(samples, bins=30, alpha=0.75)
plt.title('Standard Normal Distribution')
plt.xlabel('Value')
plt.ylabel('Frequency')
plt.show()
Output:
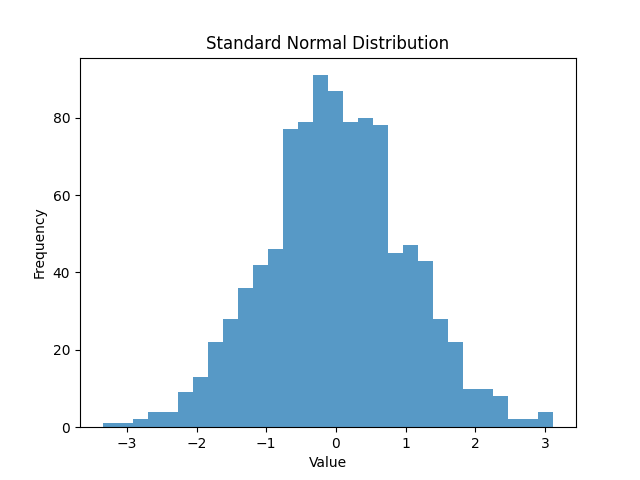
This histogram provides a visual confirmation of the distribution’s shape, reaffirming that our samples are indeed drawn from a standard normal distribution. Visualizations like this are essential for understanding the data you’re working with and for communicating findings effectively.
Conclusion
The random.Generator.standard_normal() method in NumPy is a versatile tool for generating random samples from a standard normal distribution. As we’ve seen across these examples, it’s capable of catering to a range of needs from generating single values to large arrays, and even custom distributions with specified means and standard deviations. Mastering this function can significantly aid in simulations, data modeling, and machine learning tasks, among others.


