This succinct, practical article will show you some different ways to set an image background in Next.js 13 and above (with the /app directory). Without any further ado (such as explaining what Next.js is or talking about its history), let’s get straight to the main points.
Importing the image as a file and using inline styles
This solution involves importing the image file from the public folder and using its src property to set the background image of a component. The steps to implement this idea are listed below:
- Place your image file in the
publicfolder of your Next.js project. - Import the image file in your component file using
import backgroundImage from "/your-image-name.png"; - Use the
srcproperty of the imported image object to set the background image of a component using inline styles:backgroundImage: url(${backgroundImage.src})
Example:
// src/app/page.tsx
// import the image file from public folder
// make sure to replace my image path with your own
import backgroundImage from "../../public/background.png";
export default function Home() {
return (
<div
style={{
// use the src property of the image object
backgroundImage: `url(${backgroundImage.src})`,
// other styles
backgroundPosition: "center",
backgroundSize: "cover",
backgroundRepeat: "no-repeat",
width: "100vw",
height: "100vh",
display: 'flex',
alignItems: 'center',
justifyContent: 'center'
}}
>
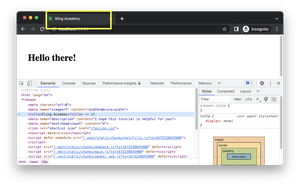
<h1 style={{fontSize: 50, color: 'white'}}>Welcome to Sling Academy!</h1>
</div>
);
}Output:

This solution is simple and straightforward. You can use any image format supported by Next.js, such as JPG, PNG, SVG, etc.
Using the next/image component
This approach makes use of the next/image component to render an image as a background of a component. It works well with both static (in the public folder) and dynamic images (fetched from API) images. It also leverages the benefits of next/image component, such as automatic resizing, optimization, and lazy loading of images. However, the tradeoff is that you’ll have to write some extra CSS to position and style things. Some CSS properties like backgroundSize and backgroundRepeat can’t be used with the image.
To implement this solution, you can follow these steps:
- Import
next/imagein your component file usingimport Image from "next/image"; - If you want to use an image from the internet, you have to specify its hostname in your
next.config.jsfile. - Use the
next/imagecomponent to render an image from the public folder or an external source using thesrcandfillprops. For instance:<Image src="your-image-URL" fill={true} /> - Use CSS properties like
position,zIndex, andopacityto adjust the appearance of the image and the component, like this:position: "relative", zIndex: -1, opacity: 0.5
In the coming example, we’ll use this image:
https://api.slingacademy.com/public/sample-photos/8.jpegTherefore, we need to add api.slingacademy.com to the images block in next.config.js as shown below:
/** @type {import('next').NextConfig} */
const nextConfig = {
    images: {
        domains: ['api.slingacademy.com'],
    }
}

module.exports = nextConfig
Example screenshot:

The code:
// src/app/page.tsx

import Image from "next/image";

export default function Home() {
  return (
    // The parent div
    <div
      style={{
        // use relative position for the parent div
        position: "relative",
        width: "100vw",
        height: "100vh",
      }}
    >
      <Image
        src="https://api.slingacademy.com/public/sample-photos/8.jpeg"
        fill={true}
        alt={"Background Image"}
      />

      {/* The child element */}
      <div
        style={{
          // use absolute position for the child element
          position: "absolute",
          top: "50%",
          left: "50%",
          transform: "translate(-50%, -50%)",
          // use higher zIndex than the image
          zIndex: 1,
          background: "yellow",
          padding: "30px",
          boxShadow: "0 0 10px rgba(0, 0, 0, 0.25)",
        }}
      >
        <h1
          style={{
            fontSize: "25px",
            color: "black",
          }}
        >
          Welcome to Sling Academy!
        </h1>
      </div>
    </div>
  );
}
Using TailwindCSS
Since Next.js 13, TailwindCSS integration is available as a choice and built-in feature when you initialize your project. You can use the className attribute to apply Tailwind’s utility classes to your elements. For example, you can use classes like bg-cover, bg-center, bg-fixed, etc. to adjust the background image.
To use a dynamic background image, you need to use the style props and provide the URL of the image as an inline style. You can’t use string concatenation to create CSS class names in TailwindCSS. The following will NOT work:
<div className={bg-[url('${imageUrl}')]>Some content</div>Here’s the way to go:
<div
      style={{ backgroundImage: `url(${imagePath})` }}
      className="h-screen bg-cover bg-center text-white border-b-8 border-b-solid border-b-slate-400"
    >
      {/* Your other components here */}
</div>
Conclusion
You’ve learned several techniques to set an image background in Next.js. You can improve the code examples to make them even better and cleaner. Add some things, remove some things, and modify some lines of code to see what happens next.
This tutorial ends here. If you find something outdated or incorrect, please let me know by leaving a comment. Happy coding & have a nice day!