In a web app, giving an active link a particular CSS style will enhance the user experience and makes it easier for them to navigate and know where they are.
This article shows you how to highlight a currently active link in Next.js. There will be two separate sections, and you only need to see one section depending on the project architecture you are using:
- Using App Router: The first section uses the modern
/appdirectory, theusePathname()hook, Tailwind CSS, and TypeScript (you will need Next.js 13 or newer). - Using Pages Router: The second section uses the traditional
/pagesdirectory, theuseRouter()hook, pure CSS, and JavaScript.
Using App Router
Overview
In order to determine whether a link is active or not, we will get information about the current route and then compare it to the href props of the link, like this:
"use client";

import { usePathname } from 'next/navigation';

{/* Get the current route */}
const currentRoute = usePathname();

{/* Render Link */}
<Link href="/some-path"
     className={currentRoute === "/some-path"
       ? "active-class-name"
       : "non-active-class-name"}>
         Some Link
</Link>
All components in the /app directory are server components by default. Therefore, we need to add the use client directive before using hooks. You’ll see more details in the complete example below.
Complete Example
App Preview
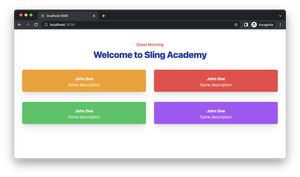
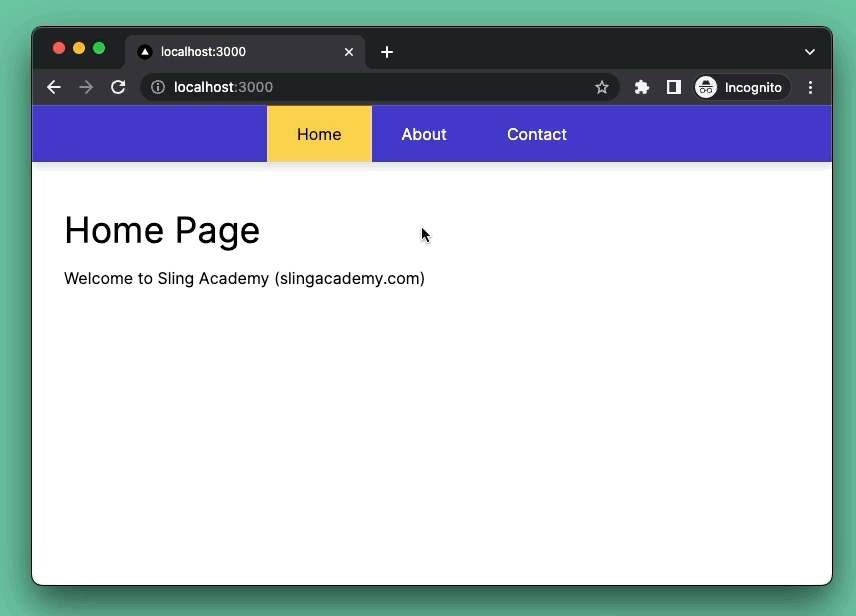
The small Next.js app we are going to build consists of three pages (routes) as follows:
/: Home/about: About/contact: Contact- You can navigate between pages by using the pink navigation bar. The non-active links will be white, and the active link will be dark with an amber background color.
Here’s the demo:
Writing Code
1. Create a new Next.js app:
npx create-next-app@latest exampleYou’ll be asked to use TypeScript and TailwindCSS. Just select Yes.
2. For simplicity’s sake, we’ll place the navigation menu in the root layout. Remove all of the default code in your app/layout.tsx file, then add the following:
// app/layout.tsx
// this is a client component
'use client';

import './globals.css';

import Link from 'next/link';
import { usePathname } from 'next/navigation';

import { Inter } from 'next/font/google';
const inter = Inter({ subsets: ['latin'] });

export default function RootLayout({
  children,
}: {
  children: React.ReactNode;
}) {
  const currentRoute = usePathname();

  // styles for all links
  const linkStyle = 'flex items-center pl-[30px] pr-[30px] h-full no-underline hover:text-amber-600 duration-300';

  // styles for active and non-active links
  const activeStyle = linkStyle + ' text-black bg-amber-300';
  const nonActiveStyle = linkStyle + ' text-white';

  return (
    <html lang='en'>
      <body className={inter.className}>
        {/* Start navigation menu */}
        <nav className='h-[56px] flex justify-center items-center bg-indigo-700 drop-shadow-lg'>
          <Link
            href='/'
            className={currentRoute === '/' ? activeStyle : nonActiveStyle}
          >
            Home
          </Link>

          <Link
            href='/about'
            className={currentRoute === '/about' ? activeStyle : nonActiveStyle}
          >
            About
          </Link>

          <Link
            href='/contact'
            className={
              currentRoute === '/contact' ? activeStyle : nonActiveStyle
            }
          >
            Contact
          </Link>
        </nav>
        {/* End navigation menu */}

        {children}
      </body>
    </html>
  );
}
The app/global.css contains some auto-generated styles. Please remove them all and only keep the Tailwind CSS stuff:
/* app/global.css */
@tailwind base;
@tailwind components;
@tailwind utilities;
3. Replace all of the unwanted code in your app/page.tsx with this:
// app/page.tsx
// this is a server component
export default function Home() {
  return (
    <div className='p-8'>
      <h1 className='text-4xl py-4'>Home Page</h1>
      <p>Welcome to Sling Academy (slingacademy.com)</p>
    </div>
  );
}
4. In the app directory, add a new folder named about. Inside this folder, created a new file called page.tsx. Add the following code to the file:
// app/about/page.tsx
// this is a server component
export default function About() {
  return (
    <div className='p-8'>
      <h1 className='text-4xl py-4'>About Page</h1>
      <p>This is the About page</p>
    </div>
  );
}
5. In the app directory, create a new folder named contact, and then add a new file named page.tsx inside this folder. Here’s the code for it:
// app/contact/page.tsx
// this is a server component
export default function Contact() {
  return (
    <div className='p-8'>
      <h1 className='text-4xl py-4'>Contact Page</h1>
      <p>This is the Contact page</p>
    </div>
  );
}
Everything is done. Here’s the file structure in the app directory of our project:
.
├── about
│   └── page.tsx (server component)
├── contact
│   └── page.tsx (server component)
├── favicon.ico
├── globals.css
├── layout.tsx (client component)
└── page.tsx (server component)
Run this command:
npm run devThen go to http://localhost:3000 to enjoy your work.
Using Pages Router (Legacy)
Overview
When using the /pages directory, you can get the current route via the pathname property of the router object returned by the userRouter() hook. You can then compare it to the href props of the link to know if it is active or not, like this:
const router = useRouter();
const currentRoute = router.pathname;

{/* Render Link */}
<Link href="/some-path"
     className={currentRoute === "/some-path"
       ? "active-class-name"
       : "non-active-class-name"}>
         Some Link
</Link>
For more clarity, see the full example below.
Complete Example
App Preview
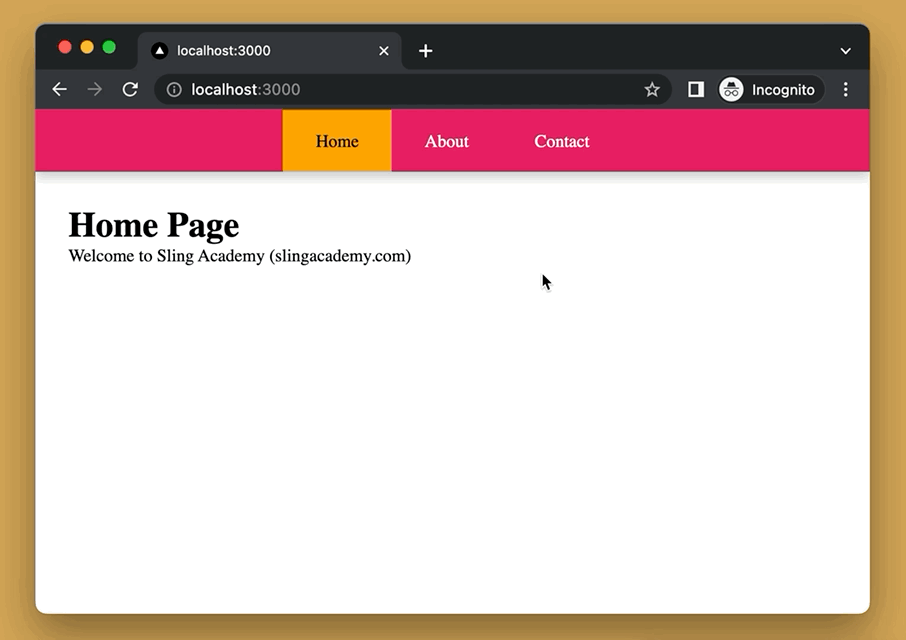
The sample project we are going to build consists of three pages (routes) as follows:
/: Home/about: About/contact: Contact
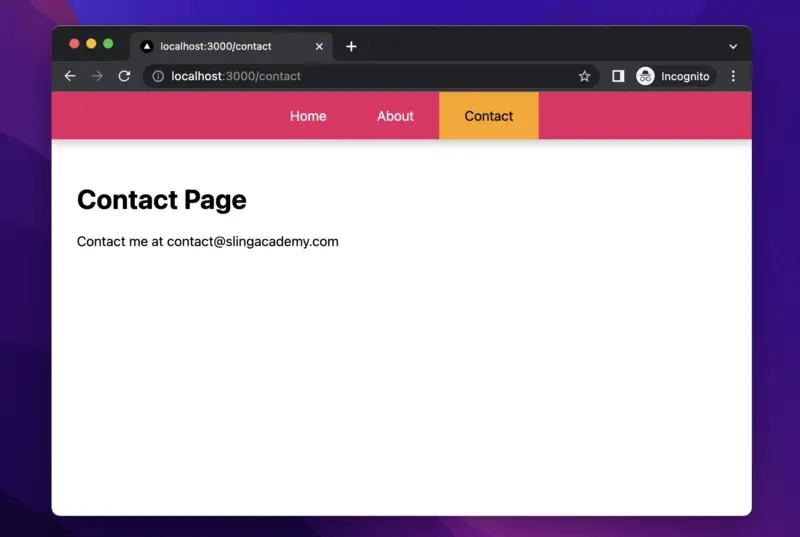
You can navigate between pages by using the pink navigation bar. The non-active links will be white, and the active link will be dark with an orange background color.
Here’s how it works:
The Code
1. To make sure we have the same starting point, please initialize a brand new Next.js project:
npx create-next-app exampleIf you are asked to use TypeScript or Tailwind CSS, select No. We won’t use these features in the steps to come.
2. In the root directory of the project, add a new folder named components. Inside this folder, create a new file called nav-bar.js. This file is where we implement the NavBar component that will be used on all three pages:
// components/nav-bar.js
import Link from 'next/link';
import { useRouter } from 'next/router';
// Import CSS
import styles from '../styles/NavBar.module.css';
// Navigation Bar
// This component will be used on all pages
const NavBar = () => {
const router = useRouter();
const currentRoute = router.pathname;
return (
<nav className={styles.topNav}>
<Link href='/' className={currentRoute === '/' ? styles.active : styles.nonActive}>
Home
</Link>
<Link
href='/about'
className={currentRoute === '/about' ? styles.active : styles.nonActive}
>
About
</Link>
<Link
href='/contact'
className={currentRoute === '/contact' ? styles.active : styles.nonActive}
>
Contact
</Link>
</nav>
);
};
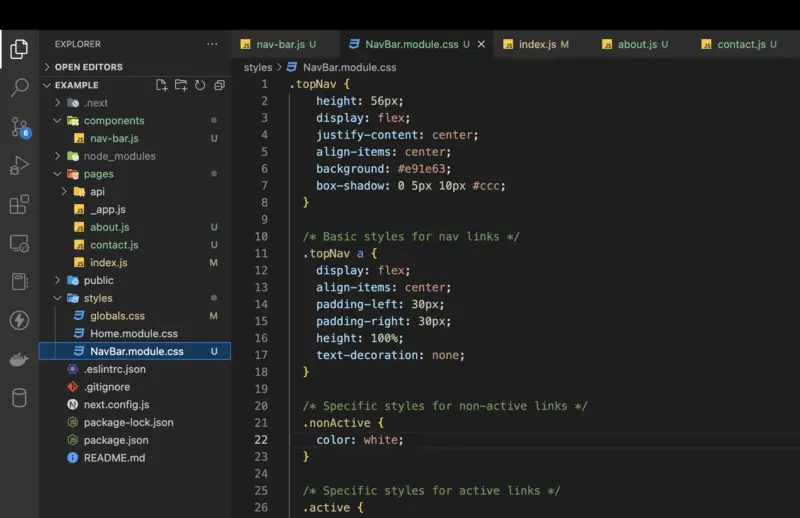
export default NavBar;3. Without CSS, our navbar cannot function as it should. In the styles folder, create a new file name NavBar.module.css then add the following code to it:
/* styles/NavBar.module.css */
.topNav {
  height: 56px;
  display: flex;
  justify-content: center;
  align-items: center;
  background: #e91e63;
  box-shadow: 0 5px 10px #ccc;
}

/* Basic styles for nav links */
.topNav a {
  display: flex;
  align-items: center;
  padding-left: 30px;
  padding-right: 30px;
  height: 100%;
  text-decoration: none;
}

/* Specific styles for non-active links */
.nonActive {
  color: white;
}

/* Specific styles for active links */
.active {
  color: black;
  background: orange;
}
Note that the styles/global.css file contains some default styles. You can remove them if you find them inappropriate to your liking.
4. Replace all of the default code in pages/index.js with the following:
// pages/index.js
import NavBar from '../components/nav-bar'

export default function Home(props) {

  return (
    <div style={{minHeight: '100vh'}}>
      <NavBar />

      <div style={{padding: 30}}>
        <h1>Home Page</h1>
        <p>Welcome to Sling Academy (slingacademy.com)</p>
      </div>
    </div>
  )
}
5. In the pages folder, create a new file named about.js, then add the following code to it:
// pages/about.js
import NavBar from '../components/nav-bar'

export default function About(props) {

  return (
    <div style={{minHeight: '100vh'}}>
      <NavBar />

      <div style={{padding: 30}}>
        <h1>About Page</h1>
        <p>This is the About page</p>
      </div>
    </div>
  )
}
6. In the pages folder, add a new file called contact.js. Here’s the code for it:
// pages/contact.js
import NavBar from '../components/nav-bar'

export default function Contact(props) {

  return (
    <div style={{minHeight: '100vh'}}>
      <NavBar />

      <div style={{padding: 30}}>
        <h1>Contact Page</h1>
        <p>Contact me at [email protected]</p>
      </div>
    </div>
  )
}
Here’s the final file structure of our project:
Let’s run it by executing the following command:
npm run devGo to http://localhost:3000 to see the result.
Conclusion
You’ve learned how to highlight active links in Next.js. You can improve the code in the example and make it even better if you want. In case you run into any problems or have questions, don’t hesitate to leave a comment.